A polyester material is utilized since it will stretch with the finishes. (Fiberglas material is not advised.) Material is normally cut to extend three inches beyond the repaired location in all instructions. The covering is used to the roofing system surface area and the material is right away pushed into the wet surface area.
 Consider An Elastomeric Roof Coating
If your roofing has stucco parapets, examine them for fractures along the sides and top. These locations frequently allow water to go into the wall and can trigger blisters and wrinkles in the roof surface area. Repair work with Elastek 103 Crack & Joint Sealant. If you do not have parapets, take a look at the metal drip edge for a tight seal with the roof membrane.
 Expancel For Elastomeric Cool Roof Coatings
 Tips For Specifying And Applying Elastomeric Coatings
Apply finish when the roof is dry and the sealant has actually set. You will be using a 9-inch heavy-duty frame, -inch paint roller for spreading covering on roofing system or 1-1/4-inch roller for dipping in pail, and a 5to-6-foot extension pole. Utilize a 3/4-inch roller with basecoats and emulsions. Draw up your roofing and make each pail fill that location.
Click To Read:
A low-cost 3-inch or 4-inch brush needs to be utilized to reach areas not possible with a roller. Utilize a stiff paintbrush for using 103 Fracture & Joint Sealant. Topcoat needs to constantly be used in a really thick coat, to achieve a rate of 100 sq. ft. per gallon, and a dry finish thickness of 10 mils.
Coatings are applied with a minimum of working the product for a maximum thickness. Work right from the pail, dipping the roller or soak roofing and spread. Provide scupper and ponding areas several extra coats for included defense. Enable each coat to dry before recoating. In cool weather, one coat a day is the optimum; 2 might be possible in the summer season.
Quick Setting Elastomeric Roof Coating
ft. per gallon, or a minimum of 20 mils dry coating. If 2 total topcoats are not applied, constantly apply two thick coats to problem locations such as scuppers, drain areas, ponding areas, seams, and fixed locations. Avoid using Elastek Solar Magic or The Guard on ponding roofings. Tidy skin and tools without delay with water.
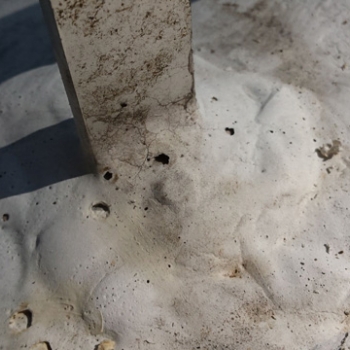
These are the wires connecting the roofing venting fan. I clipped them simply above the blue splice joints. Roofing system vent removed and cleaned up. After clipping the wire and eliminating the vent, I tidied up any remaining goop and got my very first excellent appearance at the roof frame. It's metal! 1 1/2 inches thick.
Some Recreational Vehicle roofings are framed with wood, others have metal framing. I had no idea what remained in my camper until this point. Not too delighted about the quantity of rust on it, however ideally it is still structurally sound! I scraped off some rust and made a huge mess inside the bathroom.
Oops. Possibly I ought to have put a tarp down first. My final goal of the day was to get the fridge vent cover off. I discovered Recreational Vehicle sealant blobs at 4 points on the cover so presumed there should be screws under them. I pried them up and found Phillips screw heads.
Exposing the screws in the refrigerator vent cap. Peeling old RV roofing coating on top of fridge vent cap I also noticed that there was a coat of RV roof covering over the vent cap. These coverings are painted on with a brush so plainly whoever did this finish simply blobbed in on top of whatever.
You Could Look Here: https://www.dcroofingarizona.com/residential/roof-inspection-tucson/asphalt-shingle-roof-inspection/
Taking off the cover of the fridge roofing vent. As soon as the cap is off it's more of the same. Removing more rubber and scraping off Recreational Vehicle roofing sealant and old caulk. Get comfortable due to the fact that this sucker has 32 screws in it! Ugh. Scraping lap sealant and caulk from screw heads.
Elastomeric Rv White Roof Coating
Some screws will be too rusted and require pliers to eliminate. Prying off the refrigerator roofing system vent after all screws are removed. (and the tools utilized.) Almost every screw remained in great sufficient condition to eliminate with a socket driver, but a couple were too rusty and required to be twisted out with vice grip pliers.
I peeled off the remaining rubber roof from under the flange and then removed the old putty underneath. I'll clean it much better if and when I choose to reuse it. Looks like it remains in good shape so I probably will. Removing the old putty from the flange of the fridge roof vent.
 Your Place: Elastomeric Roof Coatings Last Long, If Not A Lifetime
I scraped the framing inside the opening and found that the framing around the refrigerator vent is made of wood (unlike the metal frame around the roof vent.) Then I covered it up with a scrap of wood so I would not drop any junk into the fins on the back of the refrigerator! Here's a peek inside the refrigerator vent.
 Consider An Elastomeric Roof Coating
That's as far as I got on day 1 after about 5 hours of lazy work. Not a bad start. I also saw this remarkable slime mold growing in the mulch under the camper. If you've never ever seen a slime mold, take a look at some time lapses of them growing! They are freaking amazing! A slime mold under the camper! Now continue to step 2 when I remove the rest of the roofing components!.
?.!!.